Sunday, July 24, 2011

Repurposing a Kingsize bed quit cover

I was going through the linen closet last week, trying to have a bit of a cull. I live in an older home you see, which has a distinct lack of storage space. I’m takin’ no wardrobes, no linen cupboards and no junk closet to, well, hide all the junk. Instead, we have a bunch of Ikea wardrobes – they take up a hunk of space, but are seriously necessary. Space is at a premium, hence the cull!
I pulled out my Marriott duvet cover, which has been lurking in there for a while now.


image courtesy of Marriott UK
Now before you accuse me of being one of those take-everything-that-isn’t-bolted-down hotel guests, I actually won it. Yup – a duvet cover. Actually, it was more than just the cover – I won a kingsize bed, gorgeous linen, pillow topper for the mattress, a bazillion cushions, a duvet and the kingsize duvet cover.
Cool huh!

The king-size bed wouldn’t fit in my room though, so we sold that, but held onto everything else. But the duvet cover? I already had a spanky looking one on my bed, so it’s never been used.
I didn’t want to give it away…but then I had a brainwave. I’d cut it up!
Crazy huh – a gorgeous, brand new duvet cover, worth about $200 and I was about to cut it into pieces.
But I did.  
Firstly, I made a smaller duvet cover for the king single bed in our guest bedroom.
Then I made a matching pillow case
Then a pillowcase for the European pillow (this pillow was one from the prize loot!)
That duvet fabric just kept going!
I decided to make two smaller pillows for our main bedroom. I originally only had one square pillow, with a Sheraton pillow slip on it. Now it SERIOUSLY looked stolen, but I promise I didn’t!!! It was given to me when I went to one of their resorts for a famil (a shmancy term for a people in my industry who have to check out hotels and venues for their appropriateness to our work. Sweet job, huh!) So I cut the pillow form in half and made two matching pillow slips for them.

They’re very sweet, but I kinda thing we need a little texture there… I might remake them with a pleated front or something.

So there you have it – from one unused king-sized duvet cover to a new duvet cover and four different pillow slips. Not bad huh! Plus some fabric to spare… maybe some pretty napkins? A simple window cover for the blue bathroom window? Who knows, but I’ll let you know what I come up with!
Amy


Linking up with:

A Blogging Nightmare

The worst thing that can happen to a blogger, just happened to me.

My internet connection died....

For FOUR WHOLE WEEKS!

Bad huh. But it got worse. What could be worse than 4 weeks without internet you ask? Having a VOIP phone connected to said internet connection. So - no phone, no internet. 4 weeks.

Finally, after numerous *expensive* hours spent dealing with my service provider over my cell phone, a handful of visits from various phone cable technicians (If I hear "anytime between 8am - 1pm" again any time soon, I'm going to do an ugly cry) and a new modem later, I am reconnected to the world.

Sadly, the most frustrating part of it all was that after all that too-ing and fro-ing, it turns out that some silly Telstra phone guy accidentally unplugged our cable and everyone that came and tested the line, totally missed the fact that it wasn't plugged in at the telephone exchange place.

SERIOUSLY!! GAH!!!

ok, so rant over now. The only blessing about not having internet access for so long was that we got to watch a lot more tv got through a heap more projects around the house! Including tackling the ever-daunting chair recover project, which was an outstanding success. Step by Step tutorial coming really soon!

If you've come this far, thank you for allowing me a little self-indulgent rant & rave. Stay tuned for my next post about converting a duvet cover into... wait for it... another duvet cover! oh and a few other things.

Happy Monday & have a lovely week everyone.

Amy

Monday, June 27, 2011

5 minute tutorial: DIY jewelry stand

I have some beautiful brooches that my grandmothers have given me over the years, but sitting in a box of other trinkets, I always forget to wear them.


So here is what I came up with in order to have all my brooches on display.


5 Minute Tututorial: jewelry stand

What you'll need.

A photo frame,


Some fabric of your choice as well as some tulle and double sided tape.


Carefully remove the glass and backboard of the photo frame. You won't need to use the glass so either discard or store carefully for another project.

Using the back board as a template, cut a piece of fabric and a piece of tulle, just bigger than the photo frame.


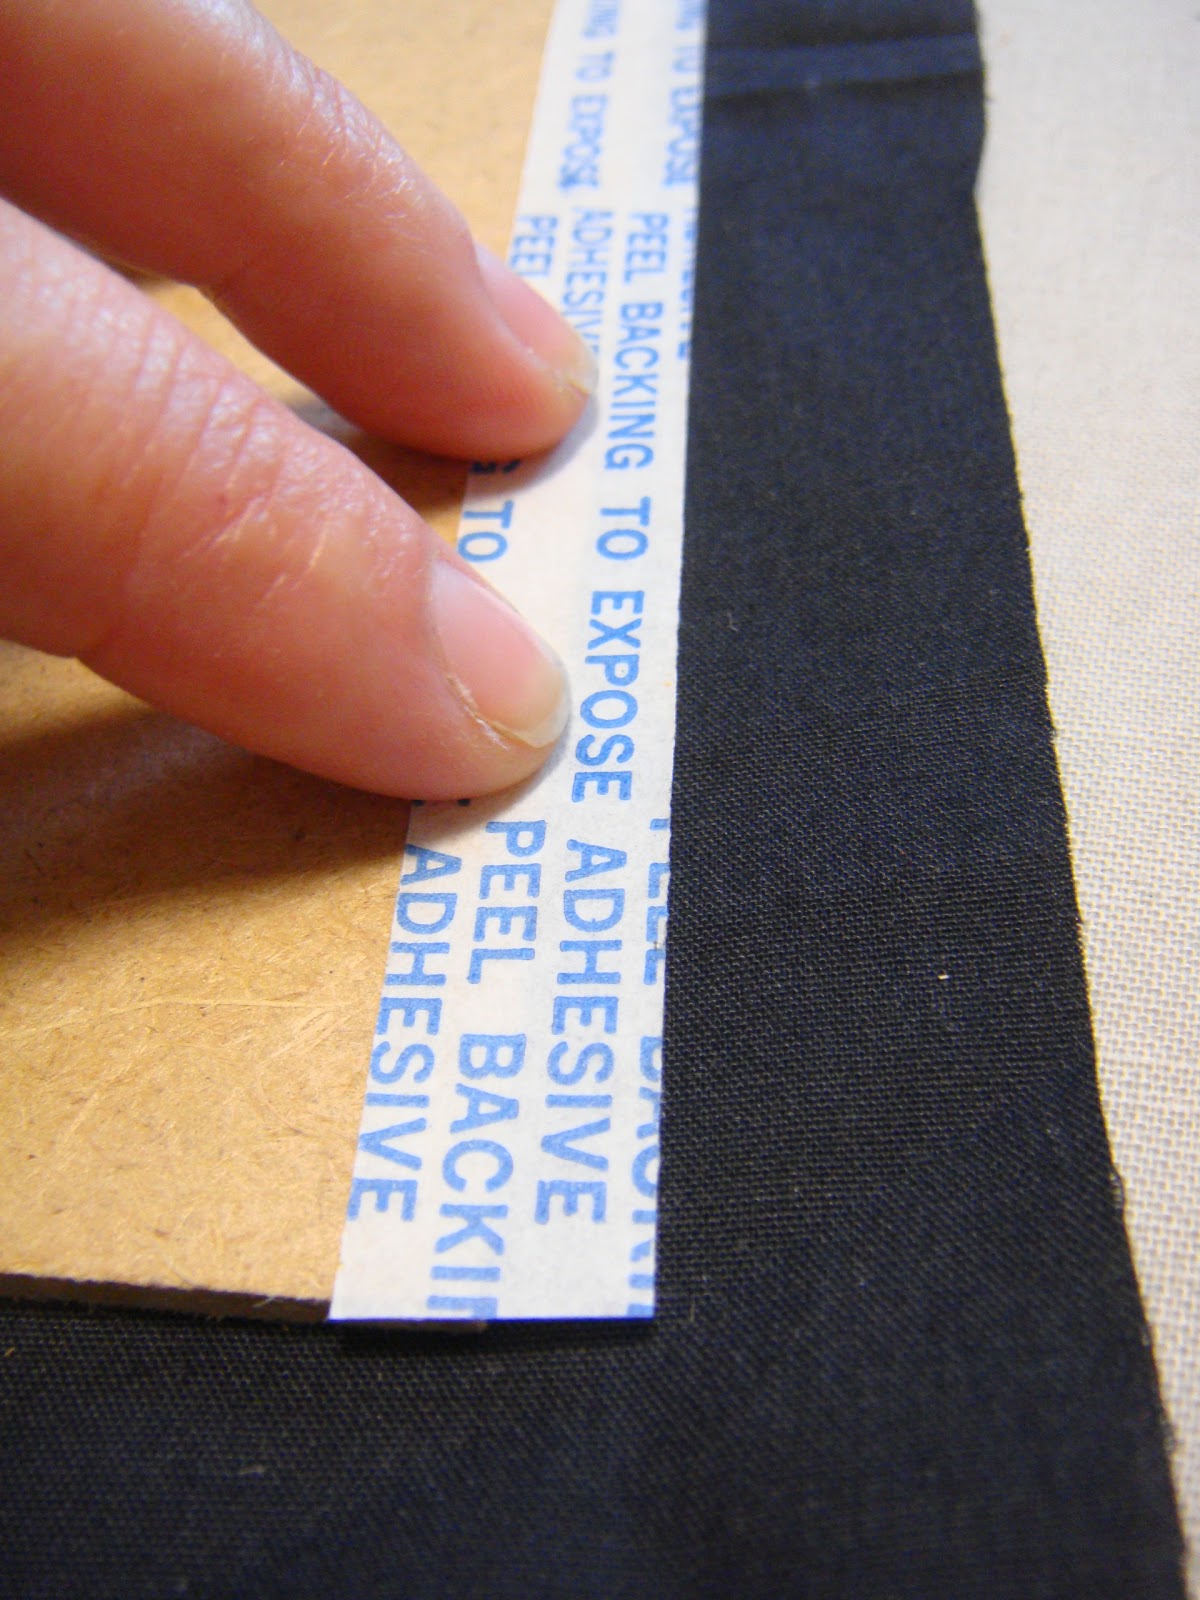
Apply some double sided tape along each edge of the backboard

Pulling firmly, tape the fabric down around each edge.


Now repeat with the tulle.

But this time, allow the tulle to have a bit of 'give' in it so that you can attach your jewelry easily.


Snip out the corners to allow the fabric to lay better on the corners.

Reassemble your frame and your ready to display your pretty things!


This is also a great way to display your earrings as well.


I love this project. Firstly, it was so quick to assemble- it took less the five minutes to make! On top of that, be a use I used materials already on hand, it was FREE!


Some alternatives:

Instead of tulle and a photo frame, you could use a cork board (just either paint it or cover it in pretty fabric) and use pins to hold up necklaces, earrings and bangles.

Have a lot of jewelry to display? Why not use a large frame and hang it on your bedroom wall as a beautiful and unique decorative feature.


This would be a really sweet gift. Why not try making one today!

Amy


linking up with:


Monday, June 20, 2011

Fixing a broken chair

I feel terrible. I had a dinner party for some friends last weekend and unbeknown to me, one of my poor friends spent the entire evening sitting on a broken chair. He was kind enough not to say anything though.

What a trooper. And what a terrible host am I !!

Being in the process of recovering these chairs, I knew it could be saved, so I unzipped the cover, and lifted up the foam cushion to see a massive crack through the particleboard base.


The base was screwed on, so I took it off, popped down to the shed and using the original as a template, whipped up a copy using a piece of sold pine and my handy jigsaw.

HAH I wish.

The best I could find was a few pieces of old fencing and a hand saw. Clearly that was going to get me nowhere, so I popped over to my grandparent's house. Fortunately, my Grandad is a retired carpenter, so HE was able to get out his jigsaw, a scrap piece of pine and cut out a new base for my chair.

THANKS GRANDAD!!

From there, I brought it home, lined it up with the chair frame...

....and marked the drill holes to reassemble the chair.....

....screwed the base back on....


....and reassembled that baby!


(The base has some felt on it as the chair cover sticks to the undeside with velcro.)

 
And BAM! All done.

It's so nice to be able to fix things and not just toss them out and buy new ones, particularly in this very throw away society we live in.

Have a great week everyone.

Amy

Wednesday, June 15, 2011

Mushrooms from compost

Y'know I've been doing quite a few "outdoorsy" posts of late, which is kinda odd, because we're smack bang in the middle of Winter, Down Under and really any sane person would be inside under a blanket watching movies and eating comfort food.

But the skies have been so clear with the sun warming the cool air, so I've been jumping at the chance too potter around the yard. It does help that I live in a city with very mild winters - where people pull out the woolies when the temperature drops to 22 degrees (thats 71 for those who do things in fahrenheit).

Anywhoo - I digress. Mushrooms. Love 'em. My favourite way of eating them? Nice and simple. Here is the recipe that I always fall back on if I feel like a lazy dinner, or just have a heap of mushrooms to use up!

Mum's mushrooms on toast recipe.

Ingredients:
Small bag of mushrooms (or a few handfuls, whatever you've got) - cleaned and sliced
1x clove of garlic - crushed
1x small brown - finely diced
cream / sour cream / cream cheese
butter
toast to serve - fabulous on toasted sourdough bread

1. Put a small knob of butter in a frypan with the onion and garlic, sautee over a low heat until onions start to caramelise
2. Add sliced mushrooms and stir until they are softened and fragrant
3. Add a little bit of cream to create a sauce - add as much as you like, but it honestly only needs enough to hold everything else together.
4. Turn off heat and continue to stir until sauce thickens.

Serve on toast. Yumm!

But hang on.. this post was supposed to be about the garden! ok, let's get to that now.

At almost $10 a kilo, mushrooms aren't cheap, but I had never considered growing them until I saw those 'mushroom farm in a box' ditties that you can buy from nurseries.....  But then I came across mushroom compost.

Do yourself a favour. Google mushroom farms in your local area.

My local mushroom farm sells bags of mushroom compost for $1. The bags are used to actually grow the mushrooms in. As soon as the bags stop growing commerical quantities of mushrooms, they sell them as compost. But talk about your lucky day, those bags still have some mushrooms left in them!

Can you see those teeny little white spots? Baby mushrooms.


Mushrooms like damp, dark spaces, and luckily enough, I have one of those in my back yard where nothing seems to grow. Here's how I created my mushroom patch.

1. gently place all the mushroom compost out on the ground in your chosen area.

2. cover with newspaper or cardboard.

mushroom patch - day one
3. wet cardboard thoroughly.


Mushroom patch close up - day 3

And that's it! Just make sure that the compost stays damp (not too wet) and the mushrooms aren't exposed to the sun (or they'll get burnt and turn brown) and you'll have your own ready supply for your favourite mushroom meal.
Mushroom patch - day 5


Mushroom patch - day 7  

This bowl of mushrooms were collected from the patch on day 7. Certainly enough for two people! Comparing them with mushrooms bought from the grocer, these are much more firm in texture, have only the faintest smell and are a very pale colour inside.


Happy gardening!

Amy

Monday, June 13, 2011

Vege Garden Update

The veges are doing so well at the moment, I thought I'd give you all a bit of an update on the colorbond vege patch.

Despite the fact that it is mid-winter here, it is going really well. So here are some pictures comparing the garden when it was planted last month, to now.

 Bok choy seedlings then...

....& now (still deciding on the right time to thin them out...)


Cherry tomatoes then...

 ...and now. I counted 46 cherry tomatoes on this one plant alone!


The left side of the garden, then...
....and now.


 Strawberries, then..

 and now.


All up, I have three different varieties of tomatoes growing. Cherry, beefsteak and tomato berry. The tomato berry variety is a small, lovely and sweet tomato. They are also growing like crazy at the moment.


Instead of having a compost bin, I bury my compost in the garden bed. I've got a few other interesting veges growing now as a a result. The plant at the back is an avocado tree (which I'm going to have to pull out, but I feel so bad!) as well as an onion and a bunch of tomato seedlings.


I've also been having a little visitor popping his head under the fence. I've put all sorts of things up as a barricade along our fenceline, but he is quite the determined little thing and keeps digging a different spot!

He's such a little sweetie, but any tips for stopping your neighbours dogs digging into your yard would be greatly appreciated!


Amy