Sunday, May 22, 2011

Pimp my Cubes!

When I was young(er) and single, I lived in a share house (our little bachelorette pad). Other than our singledom, the other thing my housemate and I had in common was our lack of money and furnishings! We were always on the lookout for bargain-basement furniture. 

When I came across these simple cubes, they met all my furniture criteria:

Cheap? $20 each. TICK
Minimal assembly? a few screws. TICK
sleek and functional? They're white boxes Amy, DUH. TICK & TICK!
I completely forgot a 'before' photo, so here's one which you can pick up from Walmart for $25 at the moment

They really are versatile little ditties. I bought three and they really can be arranged anyway you wish. I've used them in our previous apartment in the entryway - stacked three high, side by side on a countertop as a mini bookshelf and currently as a unique bedside table in our guest bedroom.

The walls in the guest bedroom are a light grey colour and I'm imagining a colourscheme of black, white and grey, with a punch of yellow in the accessories. Whilst the white cubes against the walls are quite striking, I feel like they could do with a little pimpin'. So I've decided to add some stencilled images to the backs of each.


Firstly, I unscrewed each cube

I measured the back square and using a funky sheet of scrabook paper, I cut out design that took my fancy and created a stencil.

Next, using simple black acrylic paint, I carefully stenciled the design onto three white squares of paper.


I then taped one onto each of the back boards of the cubes. I did it this way so that I can change it again if the mood takes me.  


I then reassembed the cubes back together, being careful not to tear or damage the back decorated side.


And there you have it!


I played around with the layout a bit - here they are stacked three high.
But decided that I really liked them as a little bedside table. What do you think? How gorgeous is that gerbra by the way? Such a vibrant red.


And what about the lamp? I think it matches so perfectly. It was a $4 lampshade from IKEA, which I recovered in some cute patterned fabric which I had lying around. Pretty simple to do - no tutorial required. Just grab your fabric and a glue gun!


I really love a cheap and chic make over like this. I would love to hear about your simple makeover stories - any makeover plans for the weekend?

Amy

Linking  up with:


Sunday, May 15, 2011

Chair cover project FAIL

Do you remember the feeling when you first moved out of home?

The excitement bubbling in your belly, the prospect of boundless freedom?

The thoughts of 'now I can eat/sleep/watch/play whatever I want, whenever I want!'

A little twinge of nerves, a fleeting moment of sadness but plenty of determination to do it and make it on your own.

Do you remember what your apartment/ house looked like? I suspect it was much like my first share house - a mishmash of second hand furniture, hand-me-down kitchenware and some well-used, but well-loved whitegoods. But you made it work, cause it was all yours.

A few years ago, my parents gifted me four leather dining chairs that they no longer had a need for. They were bright (each in a different colour), funky and just what I needed. By the time they reached our current house, they'd seen their fair share of dining rooms and were starting to show their age.

A makeover project was born.


With The Boy away for a week on business, I pulled out a seam ripper and started pulling the chair covers apart. It didn't seem too complex at the time (HAH!) - the covers had long zips down each of side of the chair, which when unzipped, slipped off the chair completely (with just some velcro sticking the fabric under the base of the chair).

I made my way down to Spotlight and picked myself up a serious amount of teal striped (my first mistake) fabric, ready to create some patterns and got the project underway.
.
..
...
By the end of that week, I'd managed to re-cover a grand total of ONE chair (and pulled apart a second). And that's all.


Fast forward 9 months and I've done didly-squat. This is what we've been putting up with since then.


Yep. A blue chair, a red chair, a yellow chair (in a state of disrepair - see below) and a wonky looking striped fabric chair.
Did you notice how I've strategically placed the re-covered chair and the dodgy yellow one on the far-side of the table?

So what went wrong?

Mistake one - choosing a fabric with stripes. It ain't easy lining up all those stripes on different pattern pieces. It's even harder when you've got zips down each side of the chair - it looked straight off the chair, but once zipped up, it began to pull.

Mistake two- still having my L plates on. I like to sew, and am good at the basics, but the furniture upholstery was a little too much for both me and my nan's old sewing machine. I broke a few too many needles and with the heavy fabric and wadding underneath, the machine kept jamming. It got to the point where even a straight line of sewing was more than I could handle.

Mistake three - giving up. I wasn't going to be defeated with that first chair. But once  it was done, the thought of doing it three more times was absolutely exhausting.

So where to from here? Structurally, they are still really great chairs, so I don't want to just replace them, but I can't bring myself to recover them totally.

I needed inspiration.
No, not the dog. (What a poser. She seriously tries to get in every photo I take). The new rug!


Pretty huh! It's from Bunnings (an Australian Hardware store of all places!) I've looked at it everytime I've stopped in there over the past few months and finally decided that I just HAD to have it. I was so keen to get it under the table that I didn't even take a 'before' photo without it.


It even takes the focus off the chairs (somewhat). So now I'm back on the chair cover re-do project. But this time, I'm going in simple. I've decided on some simple chair slips to go right over the top.

No zips, no wadding.

In a plain fabric. Perhaps one of these:

Fabric from Polyvore - light blue & brown tweed


Or this sort of colour - in a microfibre finish - chair for sale on ebay
 
Wish me luck! Another project to add to the list.

Amy

Tuesday, May 10, 2011

Colorbond garden beds

Having grown up on acreage, we always had a pretty decent vege patch at home. When the boy and I moved into our apartment, I decided that despite the lack of space, I’d have a go at a potted garden patch on our balcony. Sadly, I wasn’t the only one who thought it was a great idea. In what turned out to be a losing battle, some neighbourhood possums made it a nightly raid on my poor veges. Those little buggers even pulled the seedlings out of the dirt! It was a difficult experience, made worse by the sleepless nights (sitting bolt upright at the smallest noise, taking to the balcony with nothing but my pajama’ed behind and a broom) and the fact that I had promised the boy a bounty of produce.


 The balcony vege patch - full of promise....


 ....and one of the many casualties of hungry possums.


 Anywhoo, after moving into the new house, the first thing I did was plant myself a garden bed. I was finally producing some fabulous home-grown veges,  but alas, the boy was still not happy.
‘It’s ugly’ he would say.
‘It’s not a bed of roses, what do you expect? It’s saving us money!’ was my reply.
And then the accidents started. The boy’s sudden inability to mow straight would see a whole tomato plant turn to salsa in the mower’s catcher and the parsley would get an impromptu weekly pruning.
A compromise had to be made. It came in the form of colourbond garden beds.
Now I would have been happy with those ready to assemble, curved edged ditties which you can pick up from the hardware store, but with prices starting at over $100, it kinda cancelled out the savings of home-growing.
Step in my Dad, who managed to secure us some colorbond - for free!
We were given 6x 2m lengths of colorbond and a bag of screws. We were also gifted some pieces of hardwood to anchor the whole thing into the ground and a trailer-load FULL of manure and soil.


Firstly, we measured out the space for the garden bed – we decided a neat 1m x 2m size.
We cut one sheet of iron in half using an angle grinder (the boy did this. I’m not a fan of the sparks that shoot off - running around the yard with burning hair was a serious fear!)
We drilled holes in both the iron and the timber stakes, and secured them together with the bolts.

We flipped the whole thing up sidedown to secure the final sheet on the front.


We then filled the garden bed with a mixture of topsoil and horse manure and got planting!


To cover the sharp edges, I used some plastic piping (bought by the roll at Bunnings)  which I sliced through and slipped it around the whole garden bed.

Et voila! The finished project.

Rosemary and a tomato plant in the back left
some baby tomatoes appearing already!

strawberries

bok choy seedlings and a line of baby carrot seedlings in the background (don't worry, I'll thin these out shortly)


A few hints for first timers -
1.  This project was cheap as chips! Seriously, the only thing we paid for was the plastic tubing which was just over $10 for 6m. If you are looking at sourcing your own colorbond on the cheap, contact your local roofing company – they often have offcuts that you might be able to use, alternatively, try a demolition or scrap metal yard. It doesn’t have to be pretty. Plus you can always spray paint it if it’s not the right colour!
2. This is a two-person job. Choose someone who you don’t argue with and who won’t leave when they get a better offer be able to see the project through to completion! This took us two days to finish, but really, it should only take you a few hours (hey, this blog isn’t called ‘piecemeal projects’ for nothing!)
Happy garden bed constructing!

Linking up with:


Saturday, May 7, 2011

Free plants for your garden!

Yuccas are all the rage in landscaping at the moment. They're hardy, grow in all sorts of climates and are a very striking looking plant in your garden. Of course, an increase in popularity has also led to an increase in cost at my local plant nursery. A baby plant, approximately 7 inches high is currently retailing for about $15.00!
(note Bridget trying to help... actually she's digging up the toys she likes to bury in the mulch!)

If you have one or two of these growing in your yard, you've struck gold! Propagating them is super easy, here's a little step by step.
Can you see the new plants sprouting of the main one? The leaves aren't as spikey as they look - get in as close to the trunk as you can and cut them off. The stems are quite fleshy, so you could use gardening snips or even a small saw.


Collect up all your offcuts, and remove the bottom few leaves so that you have an obvious stem. this will be helpful when you plant the offcut and will stop the bottom leaves from rotting in the ground.


Leave the offcuts in a cool dry place for about 2 - 4 weeks (climate dependend) to allow the ends to dry out. You'll know they're ready to be planted when the cut end has become very dry and turned a light brown colour. The stem may also start to shrivel slightly. This is the time to get planting.

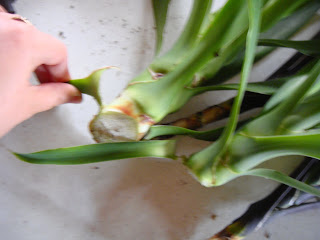
A freshly cut stem

A dried stem, ready for planting
Stick those babies straight into some good compost and leave to root for a month.  They may need a little assistance in staying upright, so a few appropriately placed twigs should be sufficient.


Then in no time, you'll have a new plant to pop into your garden. It's best to leave them for about 4 weeks to develop a root system before you replant them elsewhere. You could even pot them and give them as a unique growing gift!


Don't have any Yuccas in your yard? Keep a look out in your local area - If you have neighbours or friends who have these growing already, why not ask for a few offcuts!

happy gardening!


Linking up with: