ok guys, I'm back and I've been a busy bee and wholy moly a lot has happened since my last post.
I bought another house, got engaged, welcomed a new puppy into our already puppy crazy household, started my own company, moved out of town, set up our new home and now finally, in less than three weeks time, I'm getting married!!
I love a good bit of event planning, so this wedding thang, well it's been right up my alley. So many fun projects to share. Have you ever tried making a veil? altering a wedding dress? making a beaded sash for a dress?
On top of that, I've been knocking out walls in the new house, making bedheads, and changing plumbing fittings and fixtures so I can't wait to share it all with you!
I hope you will enjoy reading all about my fun projects - so stay tuned.
Amy
Tuesday, February 18, 2014
Monday, January 23, 2012
Cooking up a storm
Having three straight weeks off work has been BLISS! Sadly, I struggle to sit around and do nothing, so whilst my little summer break was very welcomed, it certainly wasn't a sit-around-watching-movies-and-eating-popcorn kinda holiday.
We did manage a week getaway to my parents holiday home up north. They have a beautiful house right on the water not far from Hervey Bay. As they were traveling interstate, we decided to house-sit for a week.
7 days of watching the tide come in and out from the front deck? Yup I think I can handle that!

My parents have become quite self sufficient. They have purified their rain water so that it is drinkable, they bake all their own bread and as much as possible grow all their fruit and veges in the gardens. The only thing missing are some chickens! Dad assures me that they will be the next addition to the family though.
Whilst we were there, I decided to take a leaf out of their book and do a little baking and cooking myself.
First up, on request from the boy, were a batch of cupcakes.

Then, using my very fruity smelling sour dough starter, I made lots of fresh bread. Seriously, there is nothing better than the smell (and taste!) of freshly baked bread. I'm not one for being patient, or particularly tidy, so my rising times are a bit faster than normal (seriously, 12 hours of waiting for bread to rise? Not my style). Plus, I can get away with some ugly looking loaves by calling them 'rustic'. Try it some time! People are very impressed! If only they knew....

I also made a huge batch of candied cinnamon almonds. Think roasted almonds, covered in a crunchy cinnamon donut-like coating. These babies are like my version of crack. Madly addictive. I justify eating them by the handfuls by telling myself that they are high in protein...

Lastly, after wandering around the back yard snitching all the tomatoes and passionfruits I could get my hands on, I noticed the lillypilly tree was laden with berries. I remember eating them as a kid, but hadn't really thought about cooking with them. Mainly because they are not overly sweet and have a massive seed in the middle, but dang they are the prettiest little berries! All that pink!

I did a quick google search and came across a recipe for Lillypilly and apple jelly and decided to give it a try.
 It was a pretty basic recipe - just boil up the lillypillies with a few chopped apples and once they are softened, pour the mixture through a sieve. Take the liquid and add a heap of sugar and a little lemon juice and return to the boil. The lemon juice is required as it has a high pectin content - pectin helps to make the jelly set. If you don't have lemons handy, or you want a fail safe setting jam, you can also buy Jamsetta, or any jam making sugar which will have dried pectin in it for this very purpose.
Once the jelly thickens, pour into sterilised jars and allow to cool before storing in the fridge. Here's a nifty tip to see if the jelly will set once cold:
Put a plate in the freezer. Once it is cold, remove it and place a teaspoon of the jelly on the plate. After 30 seconds, run your finger through the jelly. If it has set and gels when you touch it, you know your jelly will be set once cool. If not, you need to reduce your jelly more, or add more pectin.
 So, here is the finished product! So pretty and pink. Lovely and sweet too. If you haven't tried lillypillies before, they have a very delicate, floral flavour, almost like rosewater.
Now, after eating all that bread and jelly and cake, I better go for a jog! So much for the new year's resolutions.
We did manage a week getaway to my parents holiday home up north. They have a beautiful house right on the water not far from Hervey Bay. As they were traveling interstate, we decided to house-sit for a week.
7 days of watching the tide come in and out from the front deck? Yup I think I can handle that!

My parents have become quite self sufficient. They have purified their rain water so that it is drinkable, they bake all their own bread and as much as possible grow all their fruit and veges in the gardens. The only thing missing are some chickens! Dad assures me that they will be the next addition to the family though.
Whilst we were there, I decided to take a leaf out of their book and do a little baking and cooking myself.
First up, on request from the boy, were a batch of cupcakes.

Then, using my very fruity smelling sour dough starter, I made lots of fresh bread. Seriously, there is nothing better than the smell (and taste!) of freshly baked bread. I'm not one for being patient, or particularly tidy, so my rising times are a bit faster than normal (seriously, 12 hours of waiting for bread to rise? Not my style). Plus, I can get away with some ugly looking loaves by calling them 'rustic'. Try it some time! People are very impressed! If only they knew....

I also made a huge batch of candied cinnamon almonds. Think roasted almonds, covered in a crunchy cinnamon donut-like coating. These babies are like my version of crack. Madly addictive. I justify eating them by the handfuls by telling myself that they are high in protein...

Lastly, after wandering around the back yard snitching all the tomatoes and passionfruits I could get my hands on, I noticed the lillypilly tree was laden with berries. I remember eating them as a kid, but hadn't really thought about cooking with them. Mainly because they are not overly sweet and have a massive seed in the middle, but dang they are the prettiest little berries! All that pink!

I did a quick google search and came across a recipe for Lillypilly and apple jelly and decided to give it a try.

Once the jelly thickens, pour into sterilised jars and allow to cool before storing in the fridge. Here's a nifty tip to see if the jelly will set once cold:
Put a plate in the freezer. Once it is cold, remove it and place a teaspoon of the jelly on the plate. After 30 seconds, run your finger through the jelly. If it has set and gels when you touch it, you know your jelly will be set once cool. If not, you need to reduce your jelly more, or add more pectin.

Now, after eating all that bread and jelly and cake, I better go for a jog! So much for the new year's resolutions.
Tuesday, December 13, 2011
No longer feeling blue
Things have been a bit quiet on the project front at home with a few health issues we have been dealing with, but now that we are back on track, I've jumped feet first into some full on projects.
But I did it. I finally took the plunge and painted my blue powder room.
I have some fabulous projects to tell you about in the next few weeks, but here is a sneak peak at the no longer blue powder room!
Here's a before if you haven't been aquainted:


But I did it. I finally took the plunge and painted my blue powder room.
I have some fabulous projects to tell you about in the next few weeks, but here is a sneak peak at the no longer blue powder room!
Here's a before if you haven't been aquainted:

Blue, isn't it.
We called it the pub toilet. You know, dirty grotty looking pub toilets that are painted strange colours to hide the stains, with graffiti added by its users. The kind of toilet you'd only risk using if you were really drunk and desperate to pee...
But hold the phone, check out that same space now:
But hold the phone, check out that same space now:

OH EM GEE! Can you believe it's the same space? The best bit? The whole makeover of the room cost only $43.00.
Now that I've left you with that little tidbit, I'll be back later this week to give you the whole low down.
11 sleeps til Christmas!
Amy
Now that I've left you with that little tidbit, I'll be back later this week to give you the whole low down.
11 sleeps til Christmas!
Amy
Thursday, October 20, 2011
Placemat Pillows

Life has certainly gotten in the way of the blog these past few months. Lots of ups and unfortunately a few downs too with the sudden illness of two people in my immediate family, along with the passing of another relative. I've also been struggling through flu season as well - it seems that the recovery of one person spells the start of influenza in another! But I hope & pray that the rest of the year will be positive and uneventful!
Despite all that has been happening, I have still had to go to my day job, as well as keep up with my 'weekend' job too. Amongst it all, I decided that I needed a break, my own little time out,away from everything, so on a whim, I booked myself on a little overseas holiday to a tropical island. Fortunately my BFF lives on said tropical island, so it all worked out quite well.
So, after seven days of looking at this:

...drinking plenty of these....


...I'm feeling suitably refreshed!
But juuuust before I jumped on my flight, I was doing a last minute shop for some essentials and stumbled across some non-essentials that were on sale.

Bright & colourful placemats on sale for $2.00 each. I probably could have used them as, well, placemats, but I decided to turn them into some throw pillows for the lounge.
Honestly, I did this just before heading out to the airport and with my camera already packed, I took some quick snaps on my iphone just to show how quick and easy this project was.
First, I unpicked one end of the placemat. Then I pulled the stiff interfacing away from the fabric and cut it out.

Second, I stuffed the placemat with an old pillowform I had.

And lastly, just a quick stitch to close up the hole and they were done!

What do you think? Not bad for $4.00 and 15 minutes!
Looking forward to bringing you some other fun projects really soon.
Amy
Monday, September 12, 2011
Forgive me for the little break
I don't know where the weeks have gone, but after receiving some bad news, I've needed to take a little blog break.
You know that saying, when it rains, it pours? That's my life a the moment. My dad has been in intensive care with a heart scare, my aunt passed away, my brother was in not one, but two car accidents and my boy is also facing a major operation.
So please bear with me, and I will be back with some exciting new projects in the next few weeks.
But in the meantime, if you can send me & my family some positive energy, that would be great!
Amy
Thursday, August 4, 2011
Who loves a bargain?!
Before I continue, a note for my Aussie readers. Stop reading immediately and get thee to Spotlight!!
THE most ridiculous sales going on there at the moment. Can I share the bargains I picked up over the last weekend?
Fluffy White Bathmat $3.60

Perfect size for our petite bathroom!
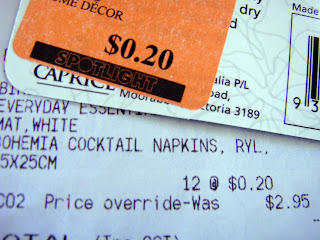
Cotton cocktail napkins 20c each.

How pretty are they? I bought a few in teal & white and blue & white. Originally marked at $2.95 EACH!


But wouldn't you know it, it rang up at the insane price of only $4.00 a metre! can-i-get-a 'HELL YEAH!!'
Anywhoo - enough showing off! Hope my fellow spotlight'ers out there have managed to bag a few bargains too.
Amy
THE most ridiculous sales going on there at the moment. Can I share the bargains I picked up over the last weekend?
Fluffy White Bathmat $3.60

Cotton cocktail napkins 20c each.

This roller blind window covering was 60% off! I seriously {heart} that! only $15.00.

What makes this even better is that I bought this one on a bit of a whim... I'm still toying with what to do with the blue powder room and thought I'd have a go at fitting this to the window - which is the good thing about roller blinds - you can cut them to size. I brought it home and I totally lucked out - it fit the window PERFECTLY - no cutting required. I was so excited, but being home alone at the time, I could only share my good fortune with the dog. She was quite obliging of my carrying-on really.... poor thing probably couldn't care less.
I also picked up some pretty fabrics for a few new throw pillows for the guest room - A gorgeous yellow stripey one and some slate grey, both 50% off. nice!
Finally, the piece de resistance of the whole shopping trip?
THIS!
I spent easily an hour walking around the upholstery fabrics, trying to redeem myself after the failed chair recover project of 2009. I saw this fabric immediately, but of course, ummmed & ahhhed about it too long and got confused. In the end, I just went back to the first one. At $12.00 a metre, it was going to be another expensive stuff up if it didn't work!
But wouldn't you know it, it rang up at the insane price of only $4.00 a metre! can-i-get-a 'HELL YEAH!!'
Anywhoo - enough showing off! Hope my fellow spotlight'ers out there have managed to bag a few bargains too.
Amy
P.S. Spotlight didn't pay me to write this. I just love the joint so much I had to share.
Monday, August 1, 2011
Chair Cover Project - Take 2

So you've alread heard a little about my ongoing dining room chair saga here and here. Call me crazy, but I decided to give them another go.

After an incredibly successful fabric shopping trip to Spotlight, I picked up some fantastic upholstery fabric - originally marked at $12.00 a metre, I was over the moon when it rang up at the register at only $4.00 a metre! Three metres for me then, thankyouverymuch!!
When I got home, I couldn't help but get straight into making some new chair covers.
 |
| I love the texture of this fabric, it's surprisingly soft! |
Call me extra crazy, but I didn't have a pattern for these and decided just to wing it. I'm a bit like that. It doesn't always go to plan I can assure you!
 |
| One long piece #1 (dotted lines are folds) and two of piece #2. |
To keep things simple, I used only three pieces of fabric to assemble the chair. One super long piece, which incorporated the back, of the chair (a) the backrest of the chair (c) the chair seat (d) and the front of the chair (e). Then I cut two 'side' pieces, which were cut by measuring (d) and (e).
The width of the main piece was (b) which fortunately, was the same width the whole way around the chair. If definitely pays to take lots of measurements to make sure everything measures up or you'll have a chair cover thats too tight to fit or too big to sit neatly.
The width of the main piece was (b) which fortunately, was the same width the whole way around the chair. If definitely pays to take lots of measurements to make sure everything measures up or you'll have a chair cover thats too tight to fit or too big to sit neatly.
I then added a small seam allowance to all the measurements and cut out my fabric. Before assembling the pieces, I hemmed the (b) ends of piece #1, as well as one (d) side of the #2 pieces

To assemble the slip cover, I flipped the fabric so the wrong side was showing upward and then pinned down the sides of the chair, and then pinned on the #2 pieces on each side.

After that, It was just a simple straight stitch along where the pins were placed and I was done.
Sewing the along the (e) lines were a bit more tricky, but once I got the hang of it and trusted my pinning technique, it worked out really well.
A quick turn out the right way and the covers slipped straight on.

I'm so pleased with how they turned out. It took me about 30 mins for each chair and with only having to purchase the fabric, this whole project only cost me $12.00. Gotta love that!
Here's a before and after of the full table setting.
 |
| Before... |
 |
| and after. |
 |
| the first failed attempt |
 |
| and the final finished product! |
They look like new chairs!
Thanks for seeing my tutorial. I hope you enjoyed it as much as I did. It's been a really rewarding & quick project - particularly as I've been procrastinating on it for so long.


Subscribe to:
Posts (Atom)